


How To Make A Custom Chocolate Bar Mold With Vacuum Forming

Chocolate bars are iconic, but maybe too much. How can chocolatiers expect to create unique products if they always use the same chocolate bar molds?
Well, times have changed. In this step-by-step guide, we’ll show you how to design and make a custom chocolate bar mold using the Mayku FormBox.
Chocolate bar size
Chocolate bars come in lots of different shapes and sizes. The average size of a full-size chocolate bar is 180x90 mm (7x3.5 in) with a weight of between 60-200g. They are usually around 6-10 mm (0.2-0.4 in) thick.

How to make a chocolate bar
- Sketch the chocolate bar design
- 3D model the basic shape
- Add manufacturing features
- 3D print the vacuum forming template
- Form the shape with the FormBox
- Make custom chocolate bars!
1. Sketch the chocolate bar design
If you’re reading this guide, you probably already have an idea for a custom chocolate bar in mind, but, have you sketched the design yet?
If you already know the size of the chocolate bar you’re creating, we suggest sketching a real-size version of the chocolate bar as it will help you see if the pieces are big enough for your design or if you will need to make the whole bar larger.
Now’s the time to unleash your creativity! With the Mayku FormBox you can prototype fast and create custom chocolate bar molds in minutes. Don’t be afraid to try different designs - Elise Epices from Arts Gourmands Paris creates unique chocolate bar molds in collaboration with graphic artists.
Similarly, Matt Bennedetto, content creator behind Unnecessary Inventions, designed Cardi B inspired chocolates.

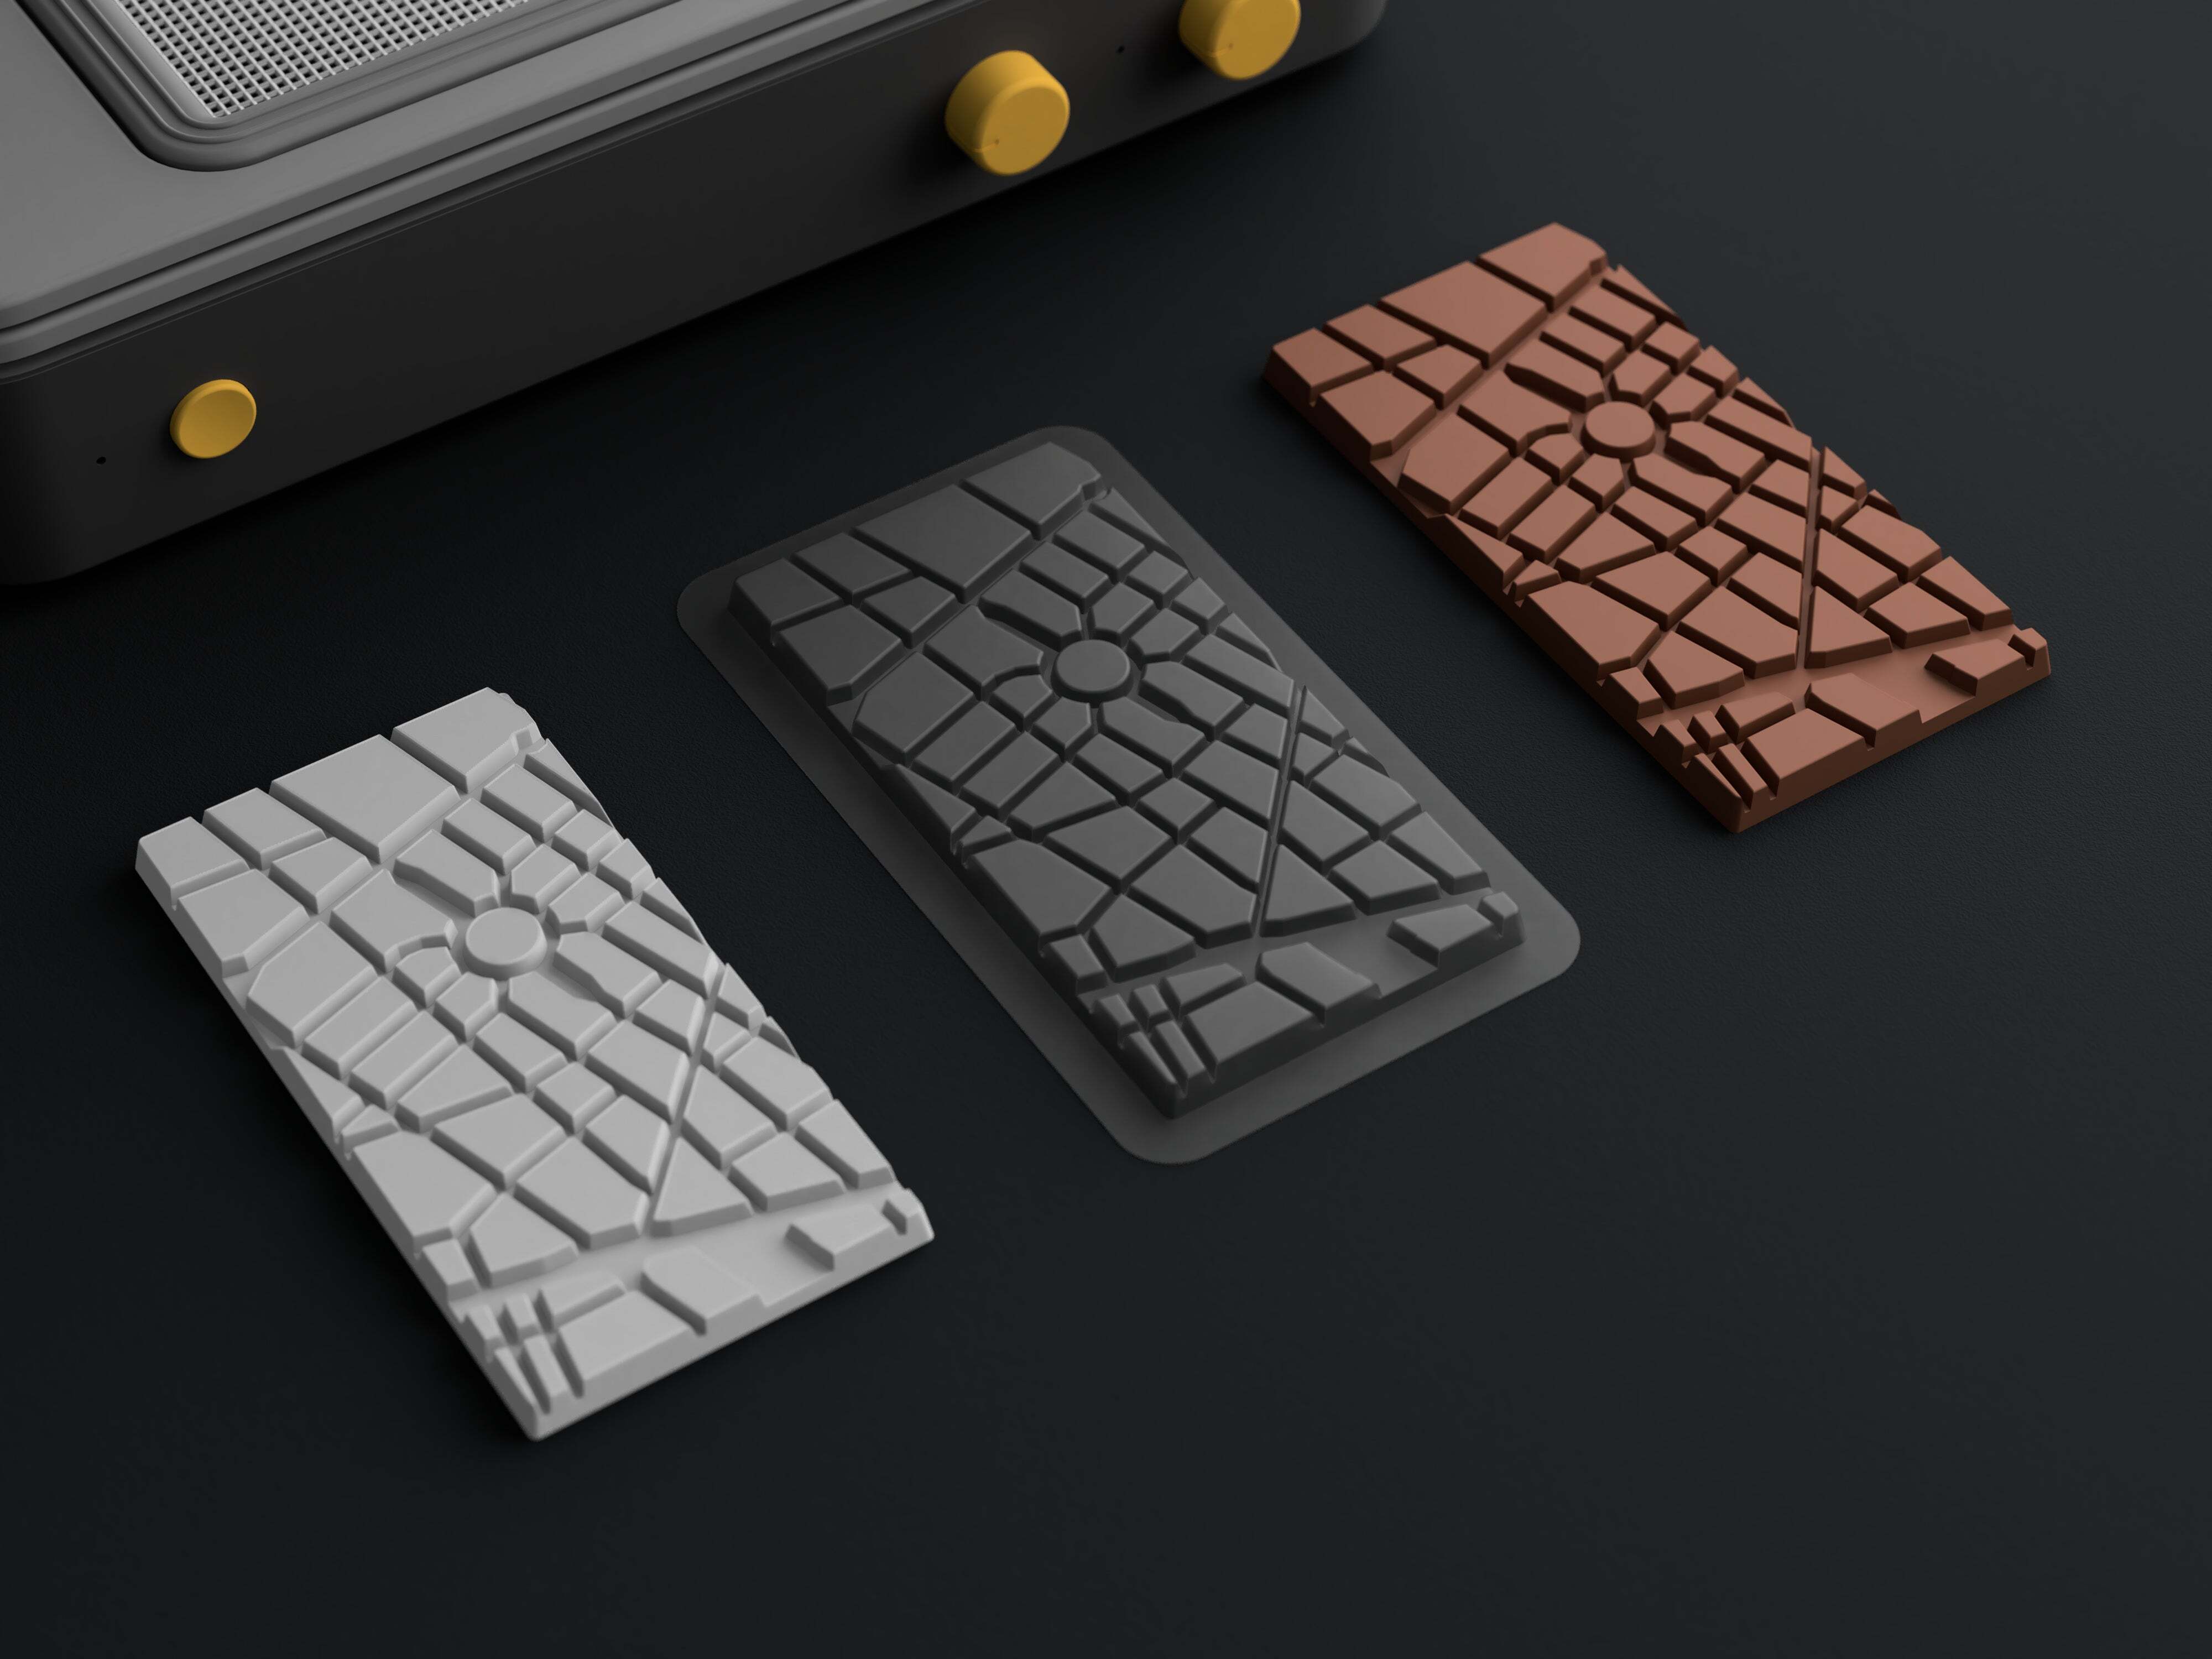
In our case, we’re going to design a custom chocolate bar mold with a map of a city. As you can see in the image below, we sketched a 1:1 version of the chocolate bar that helped us define how we had to adapt the design to make a high-quality chocolate bar mold.

Another benefit of 1:1 sketches is that you can easily transform them into vector drawings with software like Inkscape that you can later extrude.
2 . 3D model the chocolate bar
To design our chocolate bar mold we used Autodesk Fusion 360, but we recommend you use the modeling software you feel most comfortable with and make sure it’s the correct tool to make your desired model.
In our case, we used Autodesk Fusion 360 as we’re going to 3D print the template to create the mold. However, if you’re going to laser cut it, you may prefer to use software such as Adobe Illustrator or Inkscape to create your design.

Define chocolate bar’s basic shape
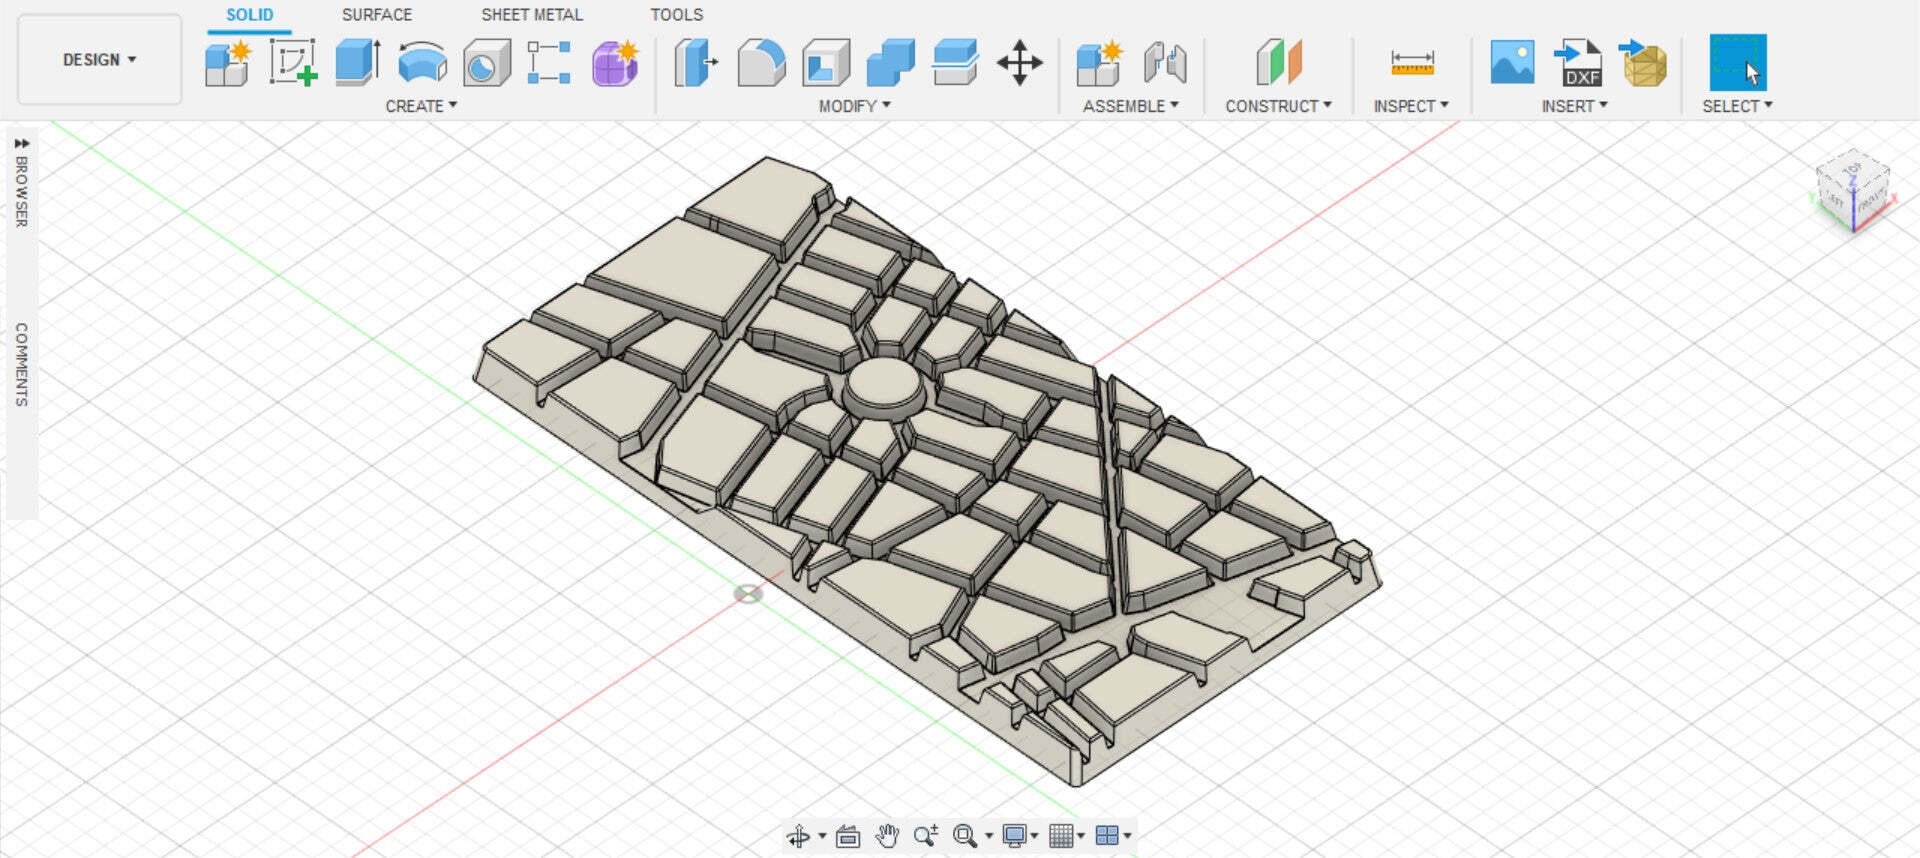
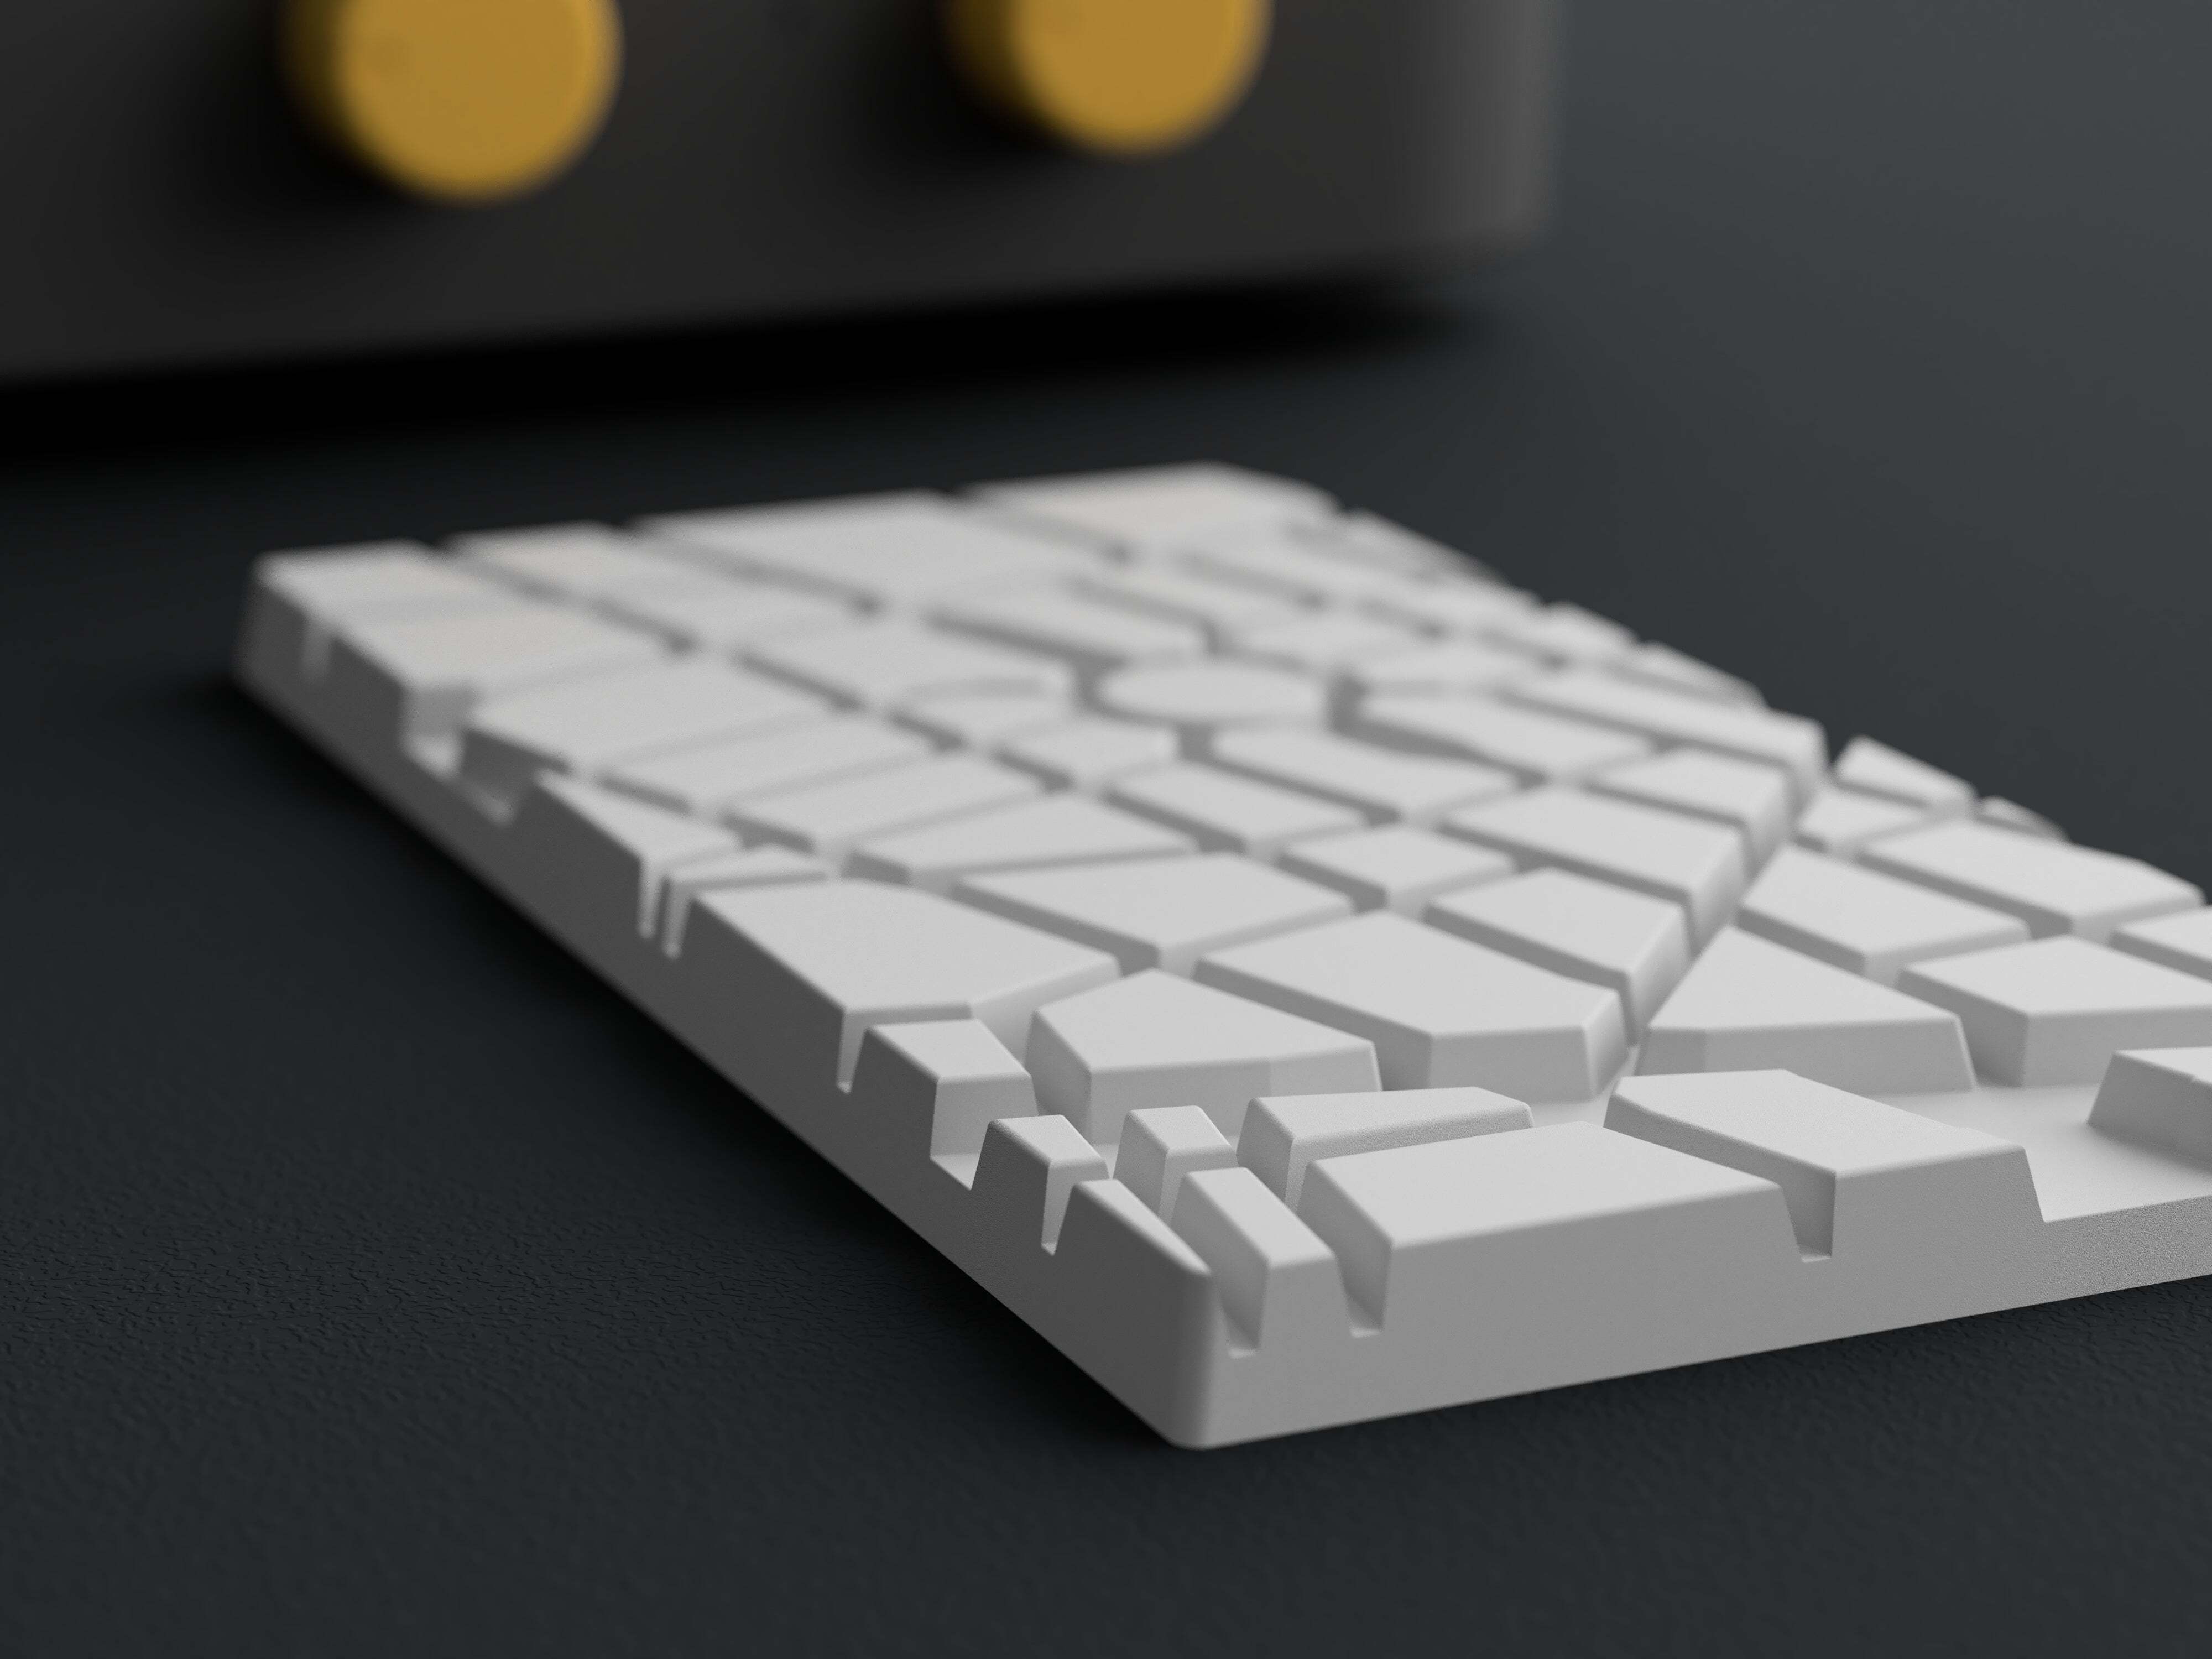
The first step is to define and 3D model the chocolate bar shape. Our city chocolate bar is going to be 160x80mm and it will have a maximum thickness of 8mm.
If you want to increase the chocolate bar weight or add a filling, you can simply increase the chocolate bar thickness. The thicker the chocolate bar mold is, the easier it is to add extra ingredients, but the harder it may be to demold depending on the shape.

Divide into sections and add surface details
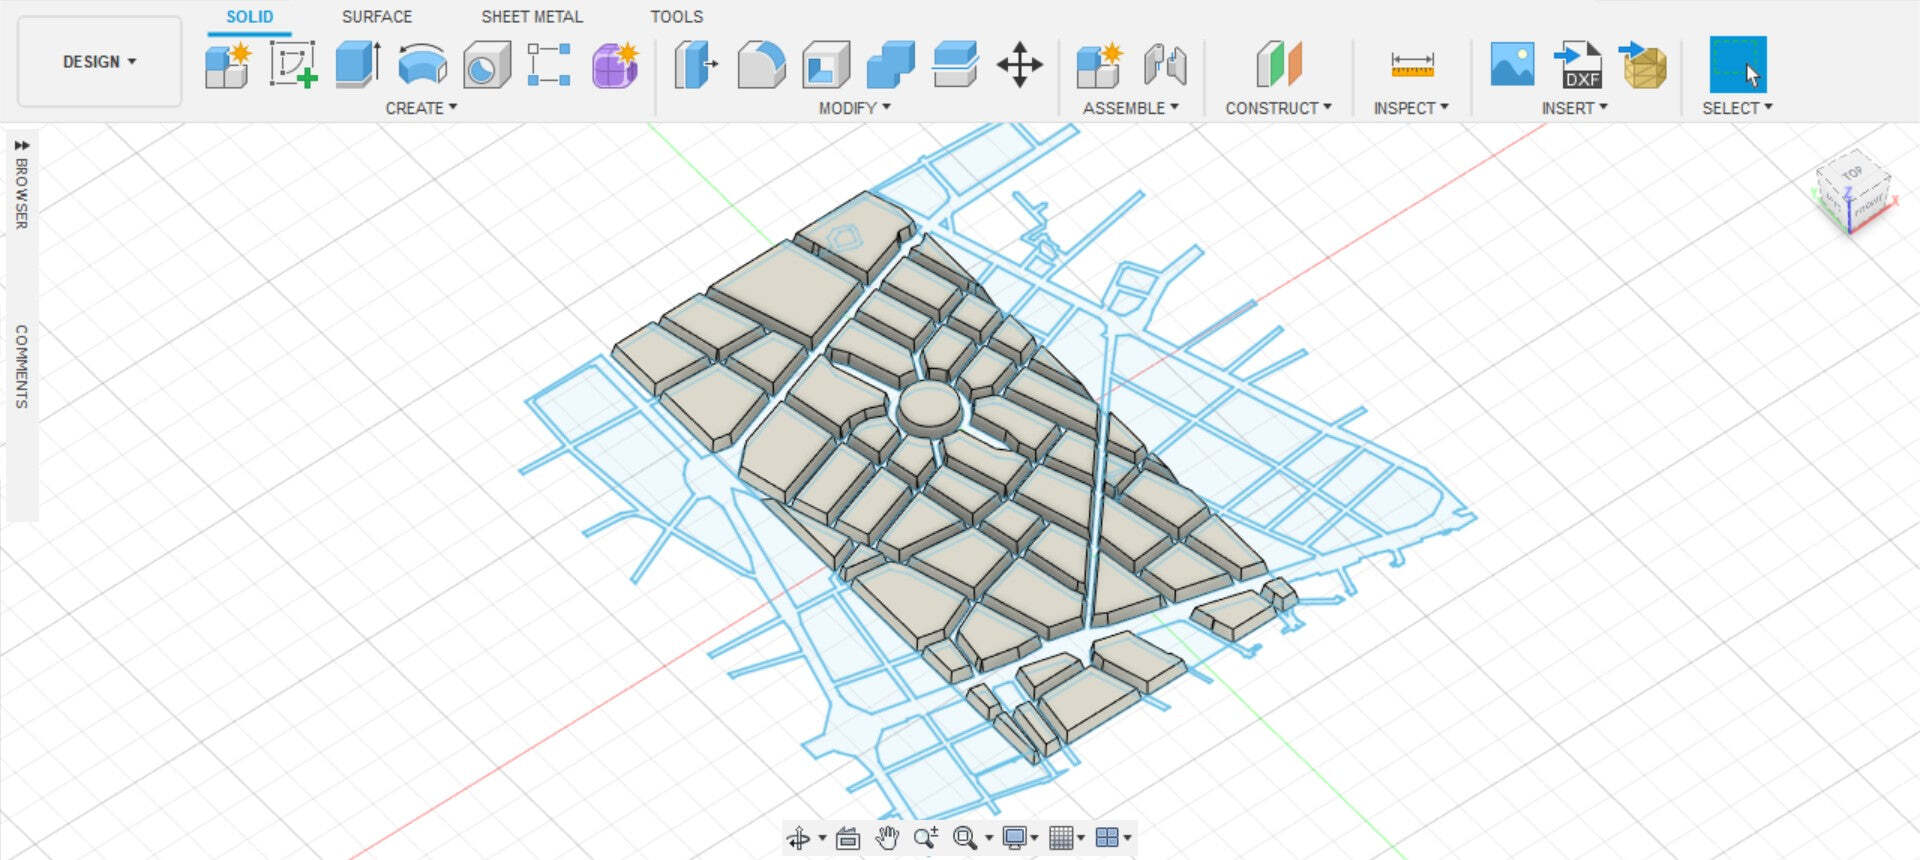
Once the basic shape is ready, we’re going to import the city vector file that we made based on the sketch and we’re going to extrude it.

You may decide to extrude the 2D shape upwards (positive extrusion) or downwards (negative extrusion). It doesn’t matter how you do it, but you’ll need to take into account the chocolate bar thickness.
In our case, we’re going to extrude the city streets upwards about 4mm, which corresponds to 50% the overall chocolate bar thickness. This will make the mold look better while offering a great experience when breaking the chocolate bar into smaller pieces.
If you want to create a unique chocolate bar mold, you can extrude shapes at different heights, add surface textures, or even add your logo. The Mayku FormBox is capable of capturing details as fine as a grain of sand.
For example, if we create a city chocolate bar where each city block is a chocolate piece, we’ll only be able to show some streets. However, if we create a chocolate bar where we show the whole neighborhood, we can play with different heights for each city block or street.
3 . Add manufacturing features
At this point, your design should be ready, but can it easily be transformed into a vacuum formed mold?
All vacuum forming templates need to follow some basic design rules for the best chance of success- check our guide and learn How to Design for Vacuum Forming.
For this design,here are two basic aspects you need to check on your design before you vacuum form the mold.
Draft angles
Even though chocolate bars aren’t too thick, it’s recommended to add a draft angle to any vertical wall. A 5-10º draft angle is recommended as it’ll produce better molds and improve the demolding process - in fact, most shop bought chocolate bars have draft angles.
We included a 10º draft angle to all vertical walls of our city chocolate bar.

Air holes
You’ll also need to add air holes if your design includes shapes where air can get trapped during the vacuum forming process or if it has small details.
In our case, we can add small air holes in the different intersections to capture more details.

Round the edges
Round the edges of the chocolate bar design at least 0.5mm. This will improve the demolding experience as well as reduce the chances of webbing

4. 3D print the vacuum forming template
There are some basic requirements when 3D printing vacuum forming templates and you can find them on our 3D Printing Guide: How to make vacuum forming templates.
If you’re using a filament 3D printer (FDM 3D printer) to make the templates, you should reduce the layer height, increase the wall thickness or infill and use a heat-resistant material. This will help you make a high-quality, reusable template.
Notice that filament 3D printing generates a unique texture on the top part of the 3D printed template. It’s recommended to sand the surface of the design or apply a resin coating to smooth it so that this unwanted detail isn’t captured on the vacuum-formed mold.

Slicing tip: Some slicers such as Ultimaker Cura or Prusa Slicer have ironing features which smooth the top surfaces. Enable this setting to 3D print smoother vacuum forming templates.
In any case, using a resin 3D printer (SLA 3D printer) is the best choice if you want to get a perfectly smooth and detailed surface.
5. Form the shape with the FormBox
Use 1mm Clear Sheets when making your own custom chocolate bar molds. With this transparent material you’ll be able to create durable molds that are easy to use and clean.

6. Make custom chocolate bars!
Create custom chocolate bar molds in hours with the Mayku FormBox. Need to produce a large order for a client? Create multiple molds using just one template and transform your workspace into a tabletop factory.
Making affordable chocolate bar molds fast with the FormBox
Creating custom chocolate bars for a customer takes a lot of time and resources. Traditional mold-making services are slow and have a high cost, reducing the profit margin and offering a suboptimal experience to the customer.
The Mayku FormBox offers a streamlined experience that helps you make custom chocolate molds in hours, giving you complete control of the process.
Forget about emails going back and forth with the mold manufacturer - that only increases the production costs of a single mold. With the FormBox, you can become your own mold manufacturer.
In the graph below, you can see how vacuum forming reduces mold production times while giving you complete control.

Vacuum forming your own custom chocolate molds also offers benefits by reducing the two-part mold production costs. With the Mayku FormBox, you can increase your profit margin while you improve the customer experience.

Also, once the template has been manufactured, more chocolate molds can be made without the need to manufacture any more templates. Make custom molds for as little as £1 each with our 0.5mm Clear Sheets.
Getting Started with Vacuum Forming and the Mayku FormBox
Remember, 3D printing is just one of the manufacturing processes you can use to create templates. You can use laser cut wood, CNC machines, or even handmade templates with the Mayku FormBox.
For more inspiration, check us out on social media. We’re @TeamMayku on all social platforms, but we also have a dedicated Facebook Group, the Mayku Community. Got a question or you’re considering investing in a FormBox? You can request to Speak to a Specialist at any time.
Continue reading
View all

How to Design for Vacuum Forming and Mold Making with Agustín Arroyo
FormBox • 5 minutes read • 2nd Feb 2022


Vacuum Forming: How To Make A Chocolate Two-Part Mold
FormBox • 11 minutes read • 26th May 2021


How to Design Enclosures and Molds using a 3D Printer and the FormBox with Agustín Arroyo
FormBox • 16 minutes read • 6th Apr 2021
Book a call
Let's chat about possible applications or any other ideas or questions you might have. Book a call with a member of our team below.
Find a timeSubmit a question
Want to know more? Send us a question and we’ll get back to you as soon as we can.
Ask nowFind a reseller
Our certified resellers have invaluable application and workflow knowledge. Connect with a reseller near you.
Connect