https://mayku.me/learn/news.atom Mayku 2024-03-05T11:57:37+00:00 https://mayku.me/learn/making-the-multiplier-our-collaboration-with-teenage-engingeering Designing the Multiplier with Teenage Engineering 2024-01-18T10:59:00+00:00 2024-01-25T11:40:43+00:00 Laura

Teenage Engineering is a consumer electronics company based in Stockholm, Sweden. 

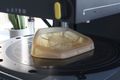
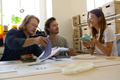
Back in the early stages of development of the Multiplier, when the first prototypes of the desktop pressure former were starting to make successful forms, Mayku got in contact with the team at Teenage Engineering to see if they would like to work on the industrial design and user interface of the machine. What transpired was a development process between London and Sweden in the midst of a global pandemic. We caught up with the team at Teenage Engineering to talk about the process…


What interested you about the project?

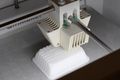
We think the most interesting part of the project was to work with the new pressure forming technology that Mayku has been developing. We love engineering-heavy projects such as this one, because we always learn something new and become better designers.


What interested you about pressure forming itself? Do you use pressure forming or vacuum forming in your workshop or prototyping? If yes, what for and why?

We did have a vacuum former years ago, a quite cumbersome machine where the process took lots of time and the results were unreliable. We saw that Mayku had already improved this field with the Formbox and had a really interesting concept for the new machine, so we didn’t hesitate to jump aboard.


How did you approach the process for designing the machine?

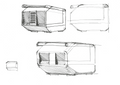
There was, of course, a lot of juggling ideas back and forth between Mayku and us. One of our company ethos is that when you really understand the engineering part, then the design part will come very naturally. So we basically designed the multiplier from inside out, in a continuous discussion with the Mayku engineering team.

How was it developing the machine during the pandemic?

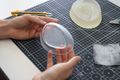
As with most other businesses during the pandemic, we had to improve our presentation skills and create much more in-depth visual communication. What really made the process easier was that Mayku really understands the value of prototyping, and were constantly testing all of the ideas we came up with together. 


What influences did you draw from?

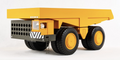
Anything from sandwich grills to Italian typewriters, we pick bits and pieces from wherever someone has solved a mechanical problem elegantly. For example, the BelAZ 540 heavy duty dump truck prototype by Valentin Kobylinsky, anything Olivetti, Husqvarna Electronic 2000, some professional kitchen dishwashers. It was fun to explore these big chunky objects for a change, as we usually work with quite small form factors and portability.

How did you approach designing the graphics for the machine interface?

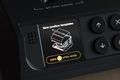
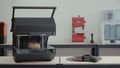
The graphics style we use comes from working with tight limitations when it comes to processing power and power consumption. Some of the displays we use in our own products draw less power if you keep the screen black as much as possible. We did not have these limitations here – but this art-style also helps focusing on what is important without cluttering the screen. The machine has a very distinct profile which makes it easy to explain what is going on, with just a simple outline and an icon. The use of a few primary high contrast colors help separating different actions and tell the users where in the process they are at a glance.

What graphic design influences do you have?

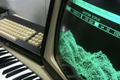
For this project, we got inspired by computer graphics found in old hardware with very tight limitations such as the Fairlight Synthesizer, IBM vintage computing, and the graphic design by Ron Cobb for Alien. As said before, we were quite excited to work with such a big form-factor, this led our thoughts to old stationary devices and their associated graphics.

How did you approach the various optioned color schemes for the machine?

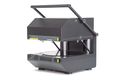
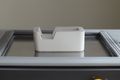
We had a few color schemes that were quite out there along the way, but we decided to stay more in-line with the Mayku brand colors in the end. I think the black works really well to enhance the monolithic look of the multiplier.

Were you happy with the outcome of the machine?

Absolutely!

Teenage Engineering have just installed a Multiplier in their new workshop - we’ll be following up on what they make with it soon! 

]]>
https://mayku.me/learn/the-mayku-multiplier-in-education The Mayku Multiplier in education 2023-11-09T11:59:00+00:00 2023-11-17T08:04:49+00:00 Agustin Arroyo

The Mayku Multiplier offers students hands-on experience in manufacturing and design, combining theory with real-world STEM applications. Recognizing the indispensable role of STEM in preparing students for an ever-evolving, fastchanging world, Mayku has been a steadfast supporter of STEM educators and students since our inception in 2016.

The Mayku Multiplier is a benchtop 3D former powered by industrial pressure forming technology. It’s compatible with polymer materials of various thicknesses and can heat sheets at a higher temperature than standard thermoforming machines. This results in highly detailed final parts and molds.

When filled with compressed air, the Multiplier’s dome exerts up to five tonnes of force. This pressure forces a heated plastic sheet into every crevice of a template, and can capture details of less than <1μm.

The Multiplier is an excellent resource for fostering creativity, enhancing problem-solving skills, and preparing students for a rapidly evolving world.
— Tanveer Sayed - Georgian College
  • Engineering students: Understanding the principles and applications of pressure forming can be essential in product development and manufacturing courses. It’s especially beneficial for those in mechanical, materials, or manufacturing engineering programs.
  • Design, art, and architecture students: Pressure forming can be used by industrial design and product design students to prototype or to create final products.
  • Lab technicians: The Multiplier is easy-to-use, easy to maintain, and safe to operate from any workbench. It already has proven applications in microfluidics research and other similar fields, which is covered in more detail in a later section.
  • Educators: Those teaching courses on manufacturing processes, materials science, or design.
Mayku Multiplier used in the Coventry University workshop

Pressure forming is a versatile tool that enriches hands-on learning across various academic settings, from specialized research labs to expansive makerspaces and innovation hubs. This technology not only aligns academic training with industry practices, but also offers several benefits:

  • Space-efficient: Despite its powerful capabilities, the machine’s compact design fits comfortably into tight workspaces.
  • User-friendly interface: Its intuitive design ensures students can get started without extensive assistance, streamlining the learning curve.
  • Clarity in concept: Explaining the Multiplier technology to students is straightforward, making it a great teaching tool.
  • Quick turnaround: With cycle times ranging between two to 20 minutes, students can see their ideas take shape in a short span, enhancing engagement.
  • Specialized applications: In smaller labs, a desktop pressure former becomes invaluable for projects needing bespoke parts. It’s an affordable means to produce various design iterations.
  • Comprehensive learning for engineering students: Beyond theoretical knowledge, hands-on exposure to pressure forming imparts vital insights into material dynamics, design boundaries, and processing variables.
  • Industry-relevant skills: Familiarity with this technology prepares students for sectors like automotive, aerospace, medical, and consumer goods, bridging classroom knowledge with real-world applications.
ABS part made with the Mayku Multiplier

Kingston University

The Engineering Design department has integrated the Multiplier into their curriculum, exposing students to cutting-edge fabrication techniques.

MIT Play Labs

Renowned for its innovative approaches, MIT Play Labs has incorporated the Multiplier into their projects and research.

Bristol Department of Aerospace Engineering

Embracing advanced manufacturing methods, this esteemed department is utilizing the Multiplier for aerospace engineering applications.

Coventry University

Students from the School of Mechanical, Aerospace, and Automotive Engineering have explored the capabilities of the Mayku Multiplier, innovating pressure forming techniques over a term. Faculty members have also closely examined its potential and evaluated its advantages for instructional purposes.

3D map project that combines dye sublimation and pressure forming developed at Coventry University

Pressure forming is undeniably impactful, with its benefits already evident across industries. Educators who integrate pressure forming into their curriculum equip students with knowledge of a transformative technology that is shaping their world.

If you’d like to explore more about integrating the Multiplier in education, visit our Education page, and download the Multiplier Education brochure.

]]>
https://mayku.me/learn/pairing-pressure-forming-with-3d-printing-in-education Pairing pressure forming with 3D printing in education 2023-11-09T11:58:00+00:00 2023-11-17T08:24:21+00:00 Agustin Arroyo

Pressure forming integrates smoothly with educational environments already equipped with existing lab technologies, such as 3D printers. These technologies work hand in hand, boosting students’ creative potential.

Students can use 3D printing for intricate designs, and achieve quick results with high-quality end products using pressure forming. Together, these technologies offer students a comprehensive toolkit for their projects.

3D printing is ideal for creating templates for thermoforming, and a technology we recommend for this. These templates, sometimes called bucks, formers, or tools, are placed inside a thermoforming machine to give shape to a plastic sheet. When this sheet is heated, it becomes flexible and takes on the template’s shape, resulting in the desired part or mold.

Popular 3D printing methods such as filament (FDM), resin (SLA), and powder (SLS) can all be used to create these templates when combined with temperature-resistant materials.

Learn more: Thermoforming and 3D printing

Thermoforming template (left) and Multiplier-made HIPS packaging prototype (right)

3D printing can be more than just producing a final object; it can be a vital stage in a broader process. By combining it with pressure forming, 3D printed pieces become tools in a more sophisticated workflow.

3D printing excels at fabricating intricate designs. Various 3D printing methods can be used to create tools for pressure forming. Instead of 3D printing being the endpoint, it becomes the starting line. Your 3D printed piece acts as a master template, setting the stage for pressure forming to replicate the design in various materials.

SLA 3D printed thermoforming template placed in the Mayku Multiplier forming area

While 3D printing has its own set of material choices, pressure forming opens up a whole new world. Whether you’re aiming for a transparent finish or a robust exterior, pressure forming can achieve it. Detailed designs can be fabricated in everyday plastics, giving them special textures or finishes. It’s also a great way to make clear and see-through items, something other manufacturing methods struggle with.

Combining technologies expands possibilities: This transparent object is impossible to fabricate with 3D printing alone, but using a 3D printed template and pressure forming together makes it possible

Need multiple copies of your design? With a 3D printed template, pressure forming can quickly churn out duplicates. You only need one 3D printed template to produce lots of pieces rapidly. It’s much simpler and more economical to store 3D printed templates than to have a large inventory.

The Multiplier complements other tools like 3D printing, and even has process advantages, particularly in terms of speed and ease of use, which is a huge benefit when you have 600 students working on their final year projects.
— Dr. Yazdi Far - Coventry University

Pressure formed pieces retain their material’s inherent characteristics and isotropic properties, ensuring final products that adhere to their design and are strong and functional.

Pressure formers and 3D printers can operate side by side. This setup creates an efficient workflow with quick turnaround times: 3D printers produce the templates, and pressure formers rapidly produce the final pieces. The combined approach is like having an assembly line right in your workspace. Start with a 3D printer and finish with a pressure former. It’s streamlined, efficient, and tailored for rapid results.

Pressure forming is undeniably impactful, with its benefits already evident across industries. Educators who integrate pressure forming into their curriculum equip students with knowledge of a transformative technology that is shaping their world.

If you’d like to explore more about integrating the Multiplier in education, visit our Education page, and download the Multiplier Education brochure.

]]>
https://mayku.me/learn/benefits-of-pressure-forming-in-education Benefits of pressure forming in education 2023-11-09T08:45:00+00:00 2023-11-17T08:30:52+00:00 Agustin Arroyo

From product design to aerospace and beyond, engineering professionals are embracing pressure forming technology, making it a growing part of everyday life. Many educational programs now feature pressure forming in their courses. However, for it to be widely adopted, there needs to be a better understanding of its numerous benefits in education.

In this blog post, we’ll explore the benefits of pressure forming. We’ll cover enhanced student engagement, teamwork, workforce growth, diverse thinking, and boosted creativity.

Pressure forming is a valuable hands-on learning method in education that improves problem-solving skills, increases engagement, and fosters creativity and critical thinking. It allows students to explore an industrial process and create tangible parts and prototypes.

Multiplier-made UHMW protective part

The Mayku Multiplier shines in educational settings due to its user-friendly design. Its guided operations direct students on each step, and built-in safety measures ensure a safe exploration space.

Mayku Multiplier intuitive user interface

Pressure forming is a quick process, making it perfect for educators on tight schedules. Students can easily modify their designs and see the results, keeping both lessons and their attention fresh. With projects completed in minutes, students stay motivated and interested. Rapid cycle times mean teachers can accomplish more within a class period, maximizing student learning opportunities.

The Multiplier's user-friendly design and fast prototyping have improved our educational processes, allowing students to experiment more effectively.
— Dr. Yazdi Far, Coventry University

Pressure forming is a versatile manufacturing technology that allows for the production of everything from basic prototypes to high-quality end-use parts, with part quality similar to injection molding.

Students can rapidly refine their designs and assess their functionality in a shorter space of time than other fabrication technologies.

Multiplier-made PMMA light cover

Just like 3D printing, pressure forming has mostly been limited to large companies for many years, limiting widespread understanding and usage. Mayku has worked hard to change that. We’ve scaled down this industry-grade technology to fit on a workbench with the Mayku Multiplier, a compact yet powerful pressure forming machine.

Today, it is essential for product development stages, such as ideation, research, and manufacturing, to work hand-in-hand. Pressure forming plays a crucial role in making this process seamless and enabling the integration of different disciplines.

Pressure forming is undeniably impactful, with its benefits already evident across industries. Educators who integrate pressure forming into their curriculum equip students with knowledge of a transformative technology that is shaping their world.

If you’d like to explore more about integrating the Multiplier in education, visit our Education page, and download the Multiplier Education brochure.

]]>
https://mayku.me/learn/product-update-unlock-access-to-hundreds-of-mayku-multiplier-materials Announcing: the Reducing Plate and Multiplier firmware 2.0 2023-09-26T01:00:00+01:00 2023-09-26T10:52:31+01:00 Agustin Arroyo

The Multiplier is a desktop pressure former that 
can achieve sub-one-micron resolution in sheet thicknesses of up to 5mm. Combined with high-resolution 3D printing, it can achieve injection mold-like quality parts right from the desktop in a matter 
of minutes.

Today, we’re launching Mayku Firmware 2.0. It includes Custom Mode, which gives you full control over your machine settings, and lets you create, save and edit material profiles for future use. Work with any factory-grade thermoforming material, whether it’s Mayku material, third-party, or any other materials you want to experiment with.

We’re also releasing a brand new accessory: The Reducing Plate. 
Seamlessly integrating with the Mayku Multiplier, the new Reducing Plate condenses the forming area of the Multiplier down to A4 or US letter format, opening up access to hundreds of global sheet suppliers and reducing waste.

Together, these new releases unlock access to hundreds of thermoforming materials you can use with your Multiplier – and combined with hi-res 3D printing, you can achieve injection mold quality parts from the desktop in a matter of minutes.

Custom mode allows you to create, save, and edit custom-forming profiles for any compatible thermoformable material. This enables you to achieve consistent, high-quality results with your own materials between 0.1 and 5mm (and with the Reducing Plate, you can use sheets over 5mm). You can precisely control temperature and pressure, allowing you to adjust the level of detail to achieve your desired finish.
 

With these new capabilities, engineers, designers, and educators can test, validate, and save their desired settings for a huge range of thermoformable materials.

By seamlessly integrating with the Mayku Multiplier, the Reducing Plate effectively shrinks the forming area to A4 or US letter format. This reduction grants access to a wide array of global sheet suppliers specializing in straight-cut sheets, making specific or specialised sheets easier to source.

Furthermore, the Reducing Plate minimizes material waste when forming smaller components, ensuring precise material usage. Because it utilises less material, it also reduces the chances of webbing on final parts.

With the Reducing Plate, you can also start to form much thicker materials, over 5mm in thickness, to create rock-solid, highly detailed parts in a vast array of different materials.
On the opposite end of the scale, the reducing plate enables the use of incredibly thin materials down to 100 microns for super-fine film application.
 

Advantages:

  • Employ readily available thermoformable materials in A4 or US Letter sizes (250 x 180 mm)
  • Handle materials thicker than 5mm.
  • Mitigate the risk of webbing on taller objects.

Combining the reducing plate and custom mode turns the Multiplier into a desktop production powerhouse, and combined with hi-res 3D printing. It can achieve injection mold quality parts from the desktop in a matter of minutes.

If you want to reduce webbing on your thermoformed parts, the Reducing Plate is a useful accessory. It allows taller tools to be used than with standard-sized multiplier sheets, and makes it possible to form thicker materials of up to 8mm.

Your Multiplier’s new firmware is available directly on your machine, and the Reducing Plate will be available from any Mayku partner starting mid-October.

Firmware updates are simple on the Multiplier – just connect the machine to your Wi-Fi network. When updated, Custom Mode will be ready to use right away. You can find more details in our Learn section.

We’d like to extend a big thanks to our community, who helped test and validate the firmware and squish all the bugs before this release. We hope these new updates will enable the wider Multiplier community to try out a huge range of new materials.

]]>
https://mayku.me/learn/introducing-the-reducing-plate-the-newest-accessory-for-the-mayku-multiplier Introducing the Reducing Plate, the newest accessory for the Mayku Multiplier 2023-09-26T01:00:00+01:00 2023-09-26T14:21:20+01:00 Agustin Arroyo

Seamlessly integrating with the Mayku Multiplier, the new Reducing Plate condenses the forming area of the Multiplier down to A4 or US letter format, opening up access to hundreds of global sheet suppliers that provide straight-cut sheets, enabling the use of both thicker and thinner materials and also reducing waste.

The Reducing Plate fits neatly in the Multipier’s forming area, condensing it down to A4 or US letter format. With sheets of this size, you have an available forming area of 250 x 180 mm and can work with rectangular sheets, making sheets much easier to source from various suppliers.

The Reducing Plate also allows taller tools to be used than with standard-sized multiplier sheets, and can reduce undesired thermoforming effects such as webbing.

Different materials have unique forming temperatures and pressures. Generally, thicker sheets demand higher pressure for effective forming. When combined with Custom Mode, the Reducing Plate enables the Multiplier to work with materials above and beyond 5mm, opening up a wide range of thermoforming materials and creating rock solid parts that don’t sacrifice detail.  

Find instructions on how to use the Reducing Plate in the video below.

Preparation

  • Have your reducing plate sheet material cut to the right size (A4 or US letter) 
  • Ensure you have heat-proof gloves (included) on hand
  • Optionally, keep a white chalk pen ready

Position the reducing plate into the Multiplier, ensuring the long edge of the reducing plate aligns with the front edge of the Multiplier.

Using the white chalk pen, outline the open area of the reducing plate onto the bed of the Multiplier. This will act as your template placement guide.

  • Loosen the screws. Turn all four screws anti-clockwise just enough to loosen them. No need to unscrew them fully.
  • Remove the top tray. Pull the handle to slide the top tray outwards. If it doesn't move smoothly, loosen the screws a bit more. Set the top tray aside for now.
  • Position the sheet material. Choose your desired sheet material and remove any protective layer. Lay the sheet over the reducing plate, ensuring it's centered.
  • Secure the sheet. Place the top tray back over the sheet and slide it to its original position. Firmly tighten all four screws, ensuring they apply roughly equal pressure. Check for any obvious gaps along the edges that you can see.
  • Insert the reducing plate. Position the entire reducing plate setup into the Multiplier. Double-check that the long edge of the reducing plate aligns with the front edge of the Multiplier.
  • Run the Multiplier. Operate the machine as you usually would. Although standard Mayku profiles can be used, setting up a custom profile using the new Custom Mode feature is advised for optimal results.
  • Post-forming process. Wear your heat-proof gloves once the forming cycle ends; the reducing plate will be hot. Carefully remove the reducing plate from the Multiplier.

Note: If it sticks onto the Multiplier's seals, use a screwdriver to gently release it while supporting the bottom to prevent it from falling.

Undo all four screws, slide the top tray out, and retrieve the formed item from the Reducing Plate. Your formed part is now ready.

The Reducing Plate will be available from all Mayku partners in mid-October. 

]]>
https://mayku.me/learn/custom-mode-access-hundreds-of-sheets-from-different-suppliers Custom Mode: Access hundreds of sheets from different suppliers 2023-09-26T01:00:00+01:00 2024-01-15T15:52:58+00:00 Agustin Arroyo

Starting today, Custom Mode is available for the Mayku Multiplier as part of the Multiplier 2.0 firmware release.

Using Custom Mode, the Multiplier can learn any new type of thermoformable sheet in a matter of minutes. Hundreds of profiles can be saved directly to the machine for future use, making it simple to use materials from any supplier. You can also edit saved profiles after you have made them.

Until now, the Multiplier’s functions have been managed through pre-configured material profiles. With Custom Mode, you have the flexibility to fine-tune the Multiplier to work seamlessly with a vast array of different thermoformable materials.. Use Custom Mode to experiment with all kinds of thermoforming materials, including Mayku Materials, third-party materials, and any other thermoforming material that you can source. Once you’ve made your profile, you can save it or edit it for future use.

Any thermoformable material between 0.1 mm and 5 mm can be used with Custom Mode. When combined with the Reducing Plate, you can create profiles for materials over 5mm, opening up an avenue of new applications. You can save and edit hundreds of material profiles directly to the Multiplier for future use.

With these enhanced capabilities, engineers, designers, and educators have the ability to experiment with, validate, and optimize settings for a vast array of factory grade thermoformable materials. 

Multiplier 2.0 (which includes Custom Mode) is available to anyone with a Mayku Multiplier. To upgrade, just connect your machine to Wi-Fi and it will update in seconds. If you need help, you can find more information in our learn section.

Follow these steps to harness the full potential of the Custom Mode for your thermoforming projects.

1. Select a sheet

Start by choosing a sheet for your project. You can use a full-size sheet cut to a 428 mm diameter circle. Alternatively, if you have a Reducing Plate, you can use A4 or US letter size sheets, which can be more efficient with material for smaller forms. Find out the material's melting temperature by asking the supplier or looking it up on the web. 

2. Create a custom profile

Once you have your melting temperature, you’re ready to head to the machine. 

  • Navigate to the materials list
  • Select "Add New Material" (located at the top)
  • Fill in the material type, temperature, and pressure*

    *Different materials have unique forming temperatures and pressures. Generally, thicker sheets demand higher pressure for effective forming. For instance, a 1 mm HIPS sheet may be optimal at 160 °C and 45 PSI, but a 3 mm HIPS sheet might need 160 °C and 60 PSI. It’s best to experiment with these settings based on your particular application.

You can optionally adjust the following:

Form time: Duration the sheet is under pressure

Cool time: Duration the sheet cools after the pressure release

Heater on pressure: Dictates when the heaters activate. You can modify this for materials that heat rapidly to minimize wait times

3. Calibrate the sheet

The Multiplier contains an in-built sheet leveling mechanism. This system enables the Multiplier to keep sheets completely level whilst heating.

During this calibration phase, ensure the sheet remains as level as possible by pressing the up and down arrows on the machine. Proper calibration is crucial to prevent issues like uneven forms or challenges when shutting the machine.

4. Save the sheet profile

After calibration, you’re ready to save the sheet profile. You can either use the generated name or assign a custom one for easier reference in the future.

We’re excited to see how Custom Mode can improve the Multiplier pressure forming workflow. Go even further by using it in combination with the Reducing Plate, available from all Mayku resellers.

]]>
https://mayku.me/learn/automated-post-processing-of-thermoformed-parts Automated post-processing of thermoformed parts 2023-07-27T18:19:00+01:00 2023-07-27T18:19:44+01:00 Agustin Arroyo

If you're working with thermoformed parts made with the Mayku Multiplier, you'll need to do some manual or automated post-processing to achieve the desired finish. In this guide, we'll explore two different automated post-processing workflows, plus the strengths and limitations of each.

A CNC machine is an effective way to streamline post-processing, but some forward-planning is involved.

CNC machine

Accuracy in CNC work relies on precisely registering the physical object being worked on within the CAD software. You’ll need to align the form with a corresponding digital model or reference point to create a precise and consistent relationship between the two. There are several ways to do this:

With a CNC machine, you have the ability to create holes that match the shape of your part. These holes can be connected to the part using pins or screws, aligning them with specific points on a template. This ensures a proper fit and alignment between the part and the template, allowing for accurate and consistent results in post-processing.

Adding a border around the mold ensures proper alignment and stability of the part during post-processing. This prevents any unintended shifting or misalignment.

Additionally, the border enables the use of reversible inlays or swapping them, allowing for milling on both sides of the part. This is beneficial when intricate details or features need to be worked on from both sides. By employing reversible inlays or strategic swapping, you can achieve precise and accurate results while maintaining the desired level of detail and quality.

Using jigs and manufacturing aids helps operators save time and ensures accurate placement of parts, leading to efficient production. A CNC machine is an excellent tool for creating these aids. Placing a form inside a jig guarantees consistent registration points for every operation.

In some cases, the part may require milling from both sides to reach intricate details or features.

Take into account the size of the drilling bit used, as it can impact the level of detail in the cut. Larger drilling bits, such as an 8mm diameter, will result in lower detail and larger rounded corners compared to a smaller 2mm diameter bit.

Forms can be securely held in place using the suction bed of the CNC machine. If this isn’t feasible, alternative methods such as clamping the templates or screwing them into the stillage board can be used.

Be sure to check your material drilling bit compatibility. It’s recommended to use single flute tooling specific to plastics for parts made by the Mayku Multiplier.

Laser cutters are highly valuable tools that complement the Mayku Multiplier, particularly when consistency and accuracy are crucial. They offer significant benefits, especially when handling larger production quantities, as they reduce the need for extensive manual labor.

Laser cutting machine

To achieve successful laser cuts, it is essential to ensure consistent positioning of the part throughout the cutting process. This alignment is crucial for matching the part's position with the laser's path. Follow these steps to ensure success:

In your design software, create a precise cutting path that matches the desired shape of the part. This path should be accurately aligned with the digital model or reference point to achieve the desired outcome.

Thermoform the part using the Mayku Multiplier, ensuring its shape conforms to the intended design.

Use a bandsaw or similar tool to roughly cut out the part, providing a basic shape for further laser cutting. You could also use the cutting techniques detailed in our manual post-processing guide.

Design a flat jig that can be securely taped to the bed of the laser cutter. This jig serves as a guide to consistently position the part for cutting. For added stability, consider using a 3D printed jig that keeps the part firmly in position within the frame.

Place the thermoformed part within the laser cut jig, ensuring perfect alignment with the cutting path. Take the necessary precautions to ensure the part remains in the same position throughout the cutting process.

Once confident in the alignment, start the laser cutter and allow it to precisely cut the part along the designated path and remove your parts from the sheet. This process can be repeated for larger batches.

Because laser cutting is a contactless technology, there’s less chance the part will move when cutting compared to the CNC workflow.

PMMA (acrylic) is an excellent plastic for laser cutting. Laser cut acrylic has crystal-clear smooth cut edges without the need for further post processing.

Laser cutting ABS is not recommended. This is because it releases toxic fumes when cutting. It can also ignite, and the quality of cut edges tends to be poor as the material melts, producing uneven edges.

Make sure to find a laser cutter with a bed that can drop down low enough to allow for the height of the part.

By automating the post-processing of parts produced on the Mayku Multiplier, you can optimize your thermoforming operation. Whether you’re producing one-off parts or batches of thermoformed parts, implementing registration techniques, milling borders, and jigs will give you consistent quality and accuracy and save you time in the long run.

Discover Mayku’s range of proven thermoforming materials to find the best fit for your workflow. Discover Mayku Multiplier materials. 
 

]]>
https://mayku.me/learn/discover-thermoforming-at-construct3d-conference-2023 Discover thermoforming at Construct3D Conference 2023 2023-07-27T17:40:00+01:00 2023-07-27T17:40:44+01:00 Agustin Arroyo

We'll be hosting three exciting workshops at the upcoming Construct3D conference, focused on thermoforming technology. Led by Tomas Yates and Sander Tuijt, these workshops will cover the principles of thermoforming and provide hands-on demonstrations.

Register for Construct3D today.

In the first workshop, "Introduction to Thermoforming in Education," attendees will learn about the benefits of thermoforming in education and how it can be integrated with other technologies. 

The workshop will take place on Wednesday, August 2 at 1:30 PM EDT. Participants will also get the opportunity to make their own thermoformed mold.

The second workshop, "Thermoforming and 3D Printing: Love at First Make," will take place on Wednesday, August 2 at 3:00 PM EDT. In this workshop, participants will learn how to design and manufacture thermoforming templates using a variety of manufacturing methods, particularly 3D printing. 

The workshop leaders will discuss different 3D printing technologies and their compatibility with Mayku's materials. A live demonstration will follow this.

In the third workshop, "How to Design for Thermoforming," attendees will explore design principles that apply to thermoforming. The workshop will take place on Wednesday, August 2 at 4:30 PM EDT. A live demonstration will compare different designs and how they affect the process and outcome.

Construct3D is a vendor-agnostic 3D printing, digital fabrication conference, and expo focused on academic use, best practices, and professional development opportunities for faculty, staff, and students from informal, K-12, and higher ed contexts. Construct3D is where passionate and curious educators and innovators converge to exchange ideas, build networks, learn new skills, and accelerate the adoption and exploration of 3D printing in education.

Learn more about Construct3D on their website.

]]>
https://mayku.me/learn/manual-post-processing-of-thermoformed-parts Manual post-processing of thermoformed parts 2023-05-24T09:01:00+01:00 2023-06-09T10:50:38+01:00 Agustin Arroyo

Discover the best ways to post-process thermoformed parts and their main advantages

If you're working with thermoformed parts made with the Mayku Multiplier, you'll need to do some manual or automated post-processing to achieve the desired finish. In this guide, we'll explore different manual post-processing workflows and tools that you can use to cut and finish your parts.

Here’s a list of different manual tools you can use to cut and finish your thermoformed parts.

Scissors are a versatile tool for freehand cutting thin materials, such as EVA 1.5mm or HIPS 1mm. They are particularly useful for cutting thin materials without the need for guides or templates. With their ease of use and accessibility, scissors are a great addition to your post-processing toolkit.

EVA 1.5mm post-processing with scissors

Kevlar scissors are designed to cut through tougher and thicker materials that could damage regular scissors. They are particularly useful for cutting thicker, soft Mayku materials such as UHMW. To cut parts made with UHMW, use a band saw first, followed by a second pass with kevlar scissors. Finally, neaten the edges with a file or sandpaper.

Cutting 3mm UHMW using kevlar scissors

When dealing with tough materials like PETG or PMMA, ultrasonic cutters can make the task a lot smoother. To ensure optimum results, it is recommended to use a powerful ultrasonic cutter with a longer blade. Mastering the technique of using such a cutter might require some practice as it’s important to be mindful of the blade's access points and cut angle to avoid blade blunting or melting.

It is also crucial to stay safe by wearing protective equipment and operating in a well-ventilated area since plastic fumes are emitted during the process.

Cutting ABS 4mm with an ultrasonic cutter

If you need to cut thin materials like EVA 1.5mm or HIPS 1mm, scalpels can be a useful tool. They are particularly effective for achieving precise cuts and finishing touches.

Cutting 1mm HIPS with a scalpel

Handheld rotary power tools, such as the Dremel, come with a wide range of accessories for various tasks, including cutting and finishing parts. The cutting discs can be used to cut thin materials, and the sandpaper accessory can remove excess material from thicker parts.

To illustrate, the ABS car component was first post-processed with a band saw to remove excess material, and then finished and sanded with a Dremel to smooth the edges.

The band saw is an essential tool for cutting rigid materials. It is a fast and reliable way to remove excess material and can be combined with more precise tools like the Dremel or ultrasonic cutter for greater precision.

If your working area doesn’t have room for a band saw, an electric jigsaw can be a great alternative, offering similar results and material compatibility.

For example, when cutting an ABS part, you would first use the band saw to do two passes: one to remove excess material and a second to get closer to the outline. Then, the edges would be sanded with a Dremel for a more consistent finish.

Removing excess material from a formed part with a band saw

When post-processing thin parts (1-1.5mm), it can be helpful to design and create a jig to guide you during the cutting process. This jig can be made using 3D printing or other technologies.

In the example below, you can see how a formed part (white) was cut with high precision thanks to the use of a 3D printed jig (black).

Here are some post-processing workflows we have tested using our materials.

Our HIPS sheets come in 1mm thickness, making them easy to post-process. After forming a blister packaging prototype, we removed the excess material with Kevlar scissors. Then, we used a 3D printed jig along with a cutter to trim the edges and achieve a consistent finish.

A band saw could have been used as an alternative, but we preferred Kevlar scissors because they didn't generate dust that would have required cleaning later.

Thanks to the flexible nature of EVA, de-molding small parts is extremely easy, and it also allows for easy part cutting using scissors, cutters, or scalpels.

If you're making a two-part mold using EVA, consider placing a piece of paper as the base below the template. This will create a permeable flat layer and prevent the EVA from capturing the dimple pattern produced from the Mayku forming bed.

Two-part mold made with EVA 1.5mm on the Mayku Multiplier

PMMA offers excellent mechanical and optical properties. For better precision, we recommend cutting it with a band saw first and then with an ultrasonic cutter. Use a Dremel with a sanding accessory for finishing, and sand by hand using high grit sandpaper for best results.

If you want the part to be fully transparent, you'll need to sand and polish the template before forming. To eliminate fine scratches, plastic polish can be used on the final part.

Carlight part made with PMMA on the Mayku Multiplier

UHMW is a great non-friction material, but that doesn’t mean it can’t be post-processed. We recommend using Kevlar scissors, a band saw, or a scalpel to cut this material. Note that an ultrasonic cutter does not work well on this material.

To finish the edges, you can either sand them or use a scalpel and jig for a clean cut.

Protective gear prototype made with the Mayku Multiplier using UHMW

Our 4mm ABS can be post-processed using many of the tools mentioned in this guide. Excess material is best removed using a band saw or an ultrasonic cutter, although automated processes such as CNCing are also possible.

For finishing, we recommend sanding with either a Dremel or by hand, and using a scalpel for deburring.

Automotive component made with the Mayku Multiplier using ABS

In the table below you can see the compatibility between some of our materials and the different post-processing tools we’ve presented in this guide.

This guide has presented manual post-processing tools and how to integrate them into your workflow. However, it's important to note that each team has a unique workflow, and each design may present unique challenges. We highly recommend testing different post-processing methods to find the one that suits you best.

Based on our experience, a band saw (or similar tool) is essential when working with thicker and more rigid materials. Other tools, such as ultrasonic cutters or the Dremel, are key to achieving high-quality part finishing.

]]>